


(Quick link: http://organicwebs.com.au/editingwebpages)
 We develop and host Joomla CMS websites. CMS stands for Content Management System, which is a website that you can edit yourself with an internet browser.
We offer a WYSIWYG editor - which makes editing easier - like using MSWord.
But there are a few quirks when it comes to webpages. Although you may not know it, when it comes to website pages, you are actually writing HTML code - and this code has its rules.
So here are a few tips in using our editor, and writing basic HTML code on your CMS website.
Editing Your Pages
First your need to log onto your website.
Then go to the page you would like to edit. Look for this icon ![]() and click it to enter the editor...
and click it to enter the editor...
Can't Edit the Page? Article Checkout (Padlocked)?
When a User edits an article, that article becomes "Checked Out" (represented by the padlock icon ![]() ). The User who has checked out the article is the only one that can modify it. This is a safety feature to prevent two Users from editing the same article at the same time, and thus avoiding one person from overwritting another's changes.
). The User who has checked out the article is the only one that can modify it. This is a safety feature to prevent two Users from editing the same article at the same time, and thus avoiding one person from overwritting another's changes.
The article remains "Checked Out" until the User clicks Save, or Cancel during editing. Once saved, the article is "Checked In" and others can then open it for editing.
However, if that User does not click Save or Cancel and instead closes their browser or jumps to another page, the article remains in a "Checked Out" state. This means no one else can edit it.
We can overide this with a "Global Checkin" which will unlock all articles currently checked out across the whole site. All Checked Out Items will be checked in, and any unsaved changes will be lost.
Save your work regularly - every 5min
As with any application, it is recommended to save your work regularly. Online web editors can timeout - so if you don't save your work your session could expire.
For security reasons, your login will expire if there is no activity for a set amount of time. If this is becoming a problem - please contact us and we can increase the timeout period.
Copying Plain Text into your Article - important!
When pasting in text from other sources such as Word, or from other web pages, you should Paste as Plain Text and then reapply the formatting to suit. If you otherwise do a regular paste, you will copy hidden codes that could effect your webpage formatting.
To paste as plain text, click ![]()
Inserting Images
Step 1: click on![]() to open the image tool. You should get a dialogue box like this one popping up...
to open the image tool. You should get a dialogue box like this one popping up...
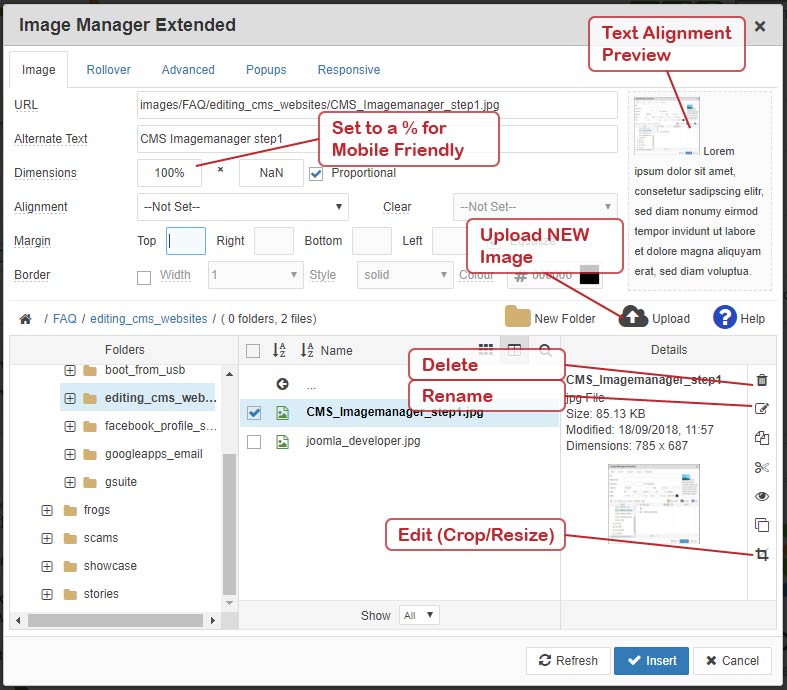
Step 2: Because you are using a live web editor, you need to upload your image from your PC to the webserver. Click on ![]() to upload a new image (its above the details window).
to upload a new image (its above the details window).
Step 3: Click on Add File... Select your file(s) and click Open.
TIP: you can select more than one file with CONTROL or SHIFT.
Step 4: Click Upload. When the files have uploaded, you should return the dialogue box above in Step 1.
Step 5: Important: find your picture and click it once, and then click again until the image details (URL, Dimensions, etc) are shown in the Article Image box. The image is now selected for inserting.
Step 6: If you need too, set the image Dimensions. Note: in Mobile Friendly Design we use % for width. Typically change the width to "100%".
Step 7: If the image too close to other objects (like text), you may need to add a margin. The Margin settings are just under the Alignment settings. Something like 10px all around is usually good.
Step 8: Press ![]() and this will inmerst the image into your story.
and this will inmerst the image into your story.
TIP: You can edit your image settings by selecting your image, and clicking the![]()
Re-size Your Images *before* Uploading Them
There are three good reasons to re-size your images before you upload them to the web...
- Small images take up less webspace
- Re-sized small images are clearer and look better.
- Small images are faster for your readers to download.
There are many ways to resize a picture...
- If you are using XP, download the image resizer power tool and you can resize in filemanager. More info here.
- You can use packages such as Photoshop, Paintshop, Corel Draw, or even Paint before you upload them.
- If you don't have a program to resize your pictures, you can get a free one here.
- There are other website that re-size pictures for you like www.resize2mail.com.
- Use the edit picture button on the Imagemanager. It looks like this
 and is found on the right hand side/lower part of the popup box. To use this button, you will need to first upload the image to the web - then resize it with the button. This is ok for a few files, but for muliple files you maye find the other methods better.
Small images like thumbnails are usually at 200 pixels wide. The largest picture you would have on your website would not be bigger than 800 pixels wide (~100kB). An image you get off a camera may be around 3500 pixel wide (~2000kB).
Sure, if you are feeling lazy you can re-size the image with![]() by changing the dimensions, but as you'll see, it will look slightly fuzzy. This is because this tool is using a basic HTML code to re-size the image. This method also does not reduce the file size - so it will take longer for your readers to see it, and it is chewing up your webhosting space.
by changing the dimensions, but as you'll see, it will look slightly fuzzy. This is because this tool is using a basic HTML code to re-size the image. This method also does not reduce the file size - so it will take longer for your readers to see it, and it is chewing up your webhosting space.
Insert a Readmore Link
For long stories we use a "Read More" link.
The link is often placed under the opening paragraph. Initially, the text above the link is displayed. If the reader clicks on the link,they will see the full story. This is particularly useful for stories on the Home page that would otherwise take up too much room.
The tool to insert a readmore link looks like this ![]()
Uploading a PDF
The proceedure for uploading a PDF is similar to uploading an image...
Step 1: Click on![]() to open the insert/edit file tool. You should get a dialogue box like this one popping up...
to open the insert/edit file tool. You should get a dialogue box like this one popping up...
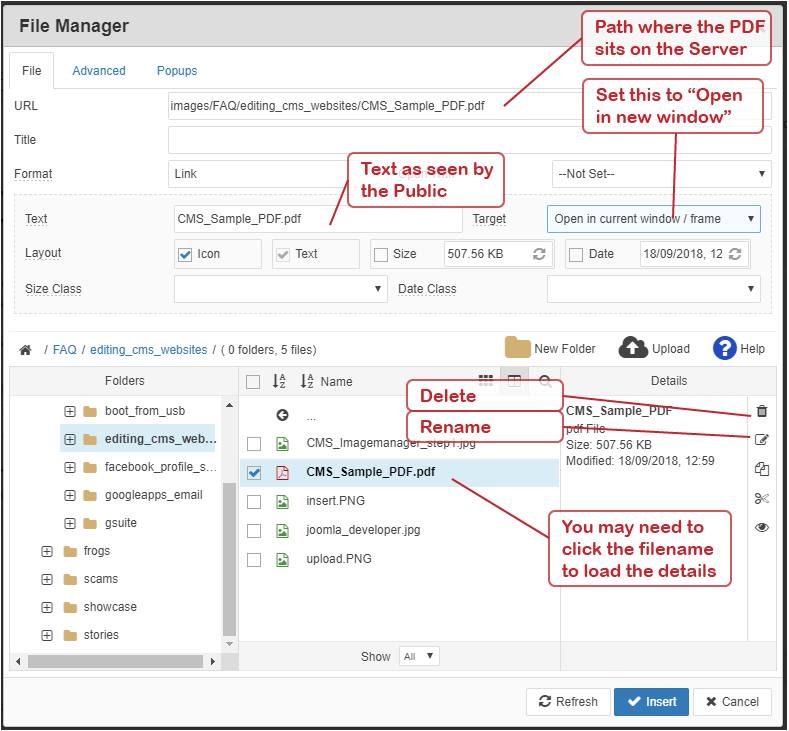
Step 2: You need to upload your PDF from your local computer onto the server for the public to see it. Click on ![]() to upload a new PDF file.
to upload a new PDF file.
Step 3: Click on Browse to find your PDF on your local computer. Select the PDF and click Open to add it to the upload list.
TIP: you can select more than one file with CONTROL or SHIFT.
Step 4: Click the Upload button to start uploading your selected PDF files. When the files have uploaded, you will then see the dialogue box again, as shown above in Step 1. The files have been uploaded from your local computer to the server, and you should be able to see them in the dialogue box.
Step 5: In teh dialogue box, click on the new PDF file that was just uploaded to the server. The URL and Text boxes will automatically fill when the PDF is selected. Continue to tweak the settings to your preference. Checking the Icon check box, and setting the Target as "Open in new window" is generally recommended practice.
Step 6: When done, click the Insert button. The dialoguebox will close and a link to the PDF file will be inserted on the web page.
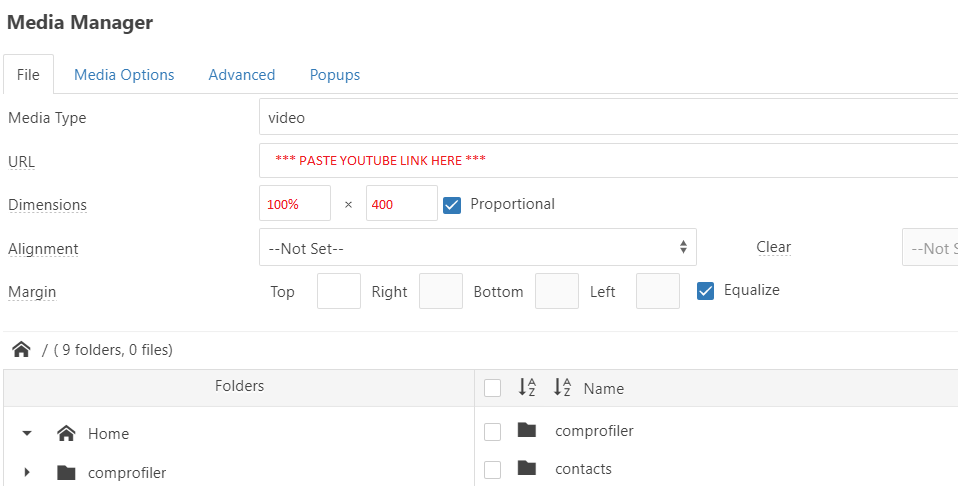
Embeding a Video
Use the Insert media tool... ![]()
Unlike pictures, we don't normally upload video to the website. Instead, we upload the video to YouTube and embed the link on the website.
Paste your Youtube link in the URL field.
For Mobile friendly sites, set the width 100%.
Keyboard Shortcuts
There are some keyboard shortcuts that are the same across applications, including our CMS.
- Control+Z: Undo
- Control+X: Cut
- Control+C: Copy
- Control+V: Paste
Use Predefined Formats
If you can. try to resist making your own styles with colours, fonts and font size. Instead, highlight your text and apply a format tag style. These format styles are basic HTML tags used in all webpages. That way all the headings on your site will look the same, and we will have better control of them if we need to change the look of your page.
The Format box looks like this ![]() - but it may have the words Paragraph in it. You can change for format with the dropdown arrow on the right.
- but it may have the words Paragraph in it. You can change for format with the dropdown arrow on the right.
The Styles box ![]() could also be used to format your text. But this may not be too helpful for you, as you'll find there are a lot of styles listed in this box that are unhelpful. This is because you are seeing styles used from behind the scenes on your webpage.
could also be used to format your text. But this may not be too helpful for you, as you'll find there are a lot of styles listed in this box that are unhelpful. This is because you are seeing styles used from behind the scenes on your webpage.
Example formats that are used regularly are:
- Paragraph - for regular paragraphs
- Heading 1 - used for things like the title of the page
- Heading 2 - used for subtitles. For example "Use Predefined Formats" is a Heading 2.
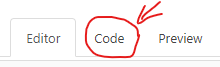
Seeing your HTML
Don't think you are writing HTML? Have a look at the Code tab to see what is happening behind the scenes...
If you understand a little HTML, you can also edit it direct by using this button. This can help sometimes if the editor gets confused.
Inserting Links
Use this tool ![]() to insert a link. Sometimes you need to high light some text for the tool to become active. You can use the same tool to edit a link.
to insert a link. Sometimes you need to high light some text for the tool to become active. You can use the same tool to edit a link.
When linking to one of your own pages, use the link tool and under the Content section, find and select your article.
Webmaster's TIP: when you are linking to an outside site, set the Target to be Open in new window. This will open a new window for the outside site, and the reader won't loose your web page. As a webmaster - you don't want your readers to loose your webpage.
Misbehaving Formatting
If the format of your text is misbehaving - it is most likely due to some hidden codes. To fix, you need to remove all the formatting and the reapply it. There are a few ways to do this. Try one of these...
- Try to clean up the hidden text by selecting large sections and clicking the erase formatting icon (
 )
) - Select all you text from start to finish. Cut and paste as text (
 ). You'll have to re-insert your images and tables again.
 - Last resort for the advanced user - get into the HTML code and manually clean it up. You can edit the HML code by clicking on the Code tab...
How to Space Paragraphs With More Than One Line.
Some internet browsers will delete empty lines. The editor will also do this in an effort to show you what some of your readers will see.
If you really would like a big gap between paragraphs, simply add a Space on each line and then Enter. Like below...
Because the space is there, its not an empty line, hence it doesn't get ignored.
SHIFT + ENTER
Holding the SHIFT key when pressing ENTER is different than just an ENTER.
- SHIFT+ENTER is used for a new line, not not a new paragraph. The gap between lines of text will be small.
- ENTER (alone) means new paragraph - so there is often a bigger gap inserted between the text.
RESPONSIVE WEBPAGES (MOBILE FRIENDLY)
For Responsive (mobile friendly) pages, there will be HTML DIV elements that will contain class codes like "class="row" and class="col-md-6". There are important to make the page Mobile friendly. You will see these if you click on "Toggle Codes" in the editor.
Also when you are editing a mobile friendly webpage, images may increase in size to 100%. This is OK. When you Save and Close, you will see the final responsive page.
We use the Bootstrap conventions for mobile friendliness - so it is worth a read of the Bootstrap guidelines to familiarise yourself. In particular, learn about the grid system.
More on Bootstrap here... www.getbootstrap.com/css
